- Installing the Z Directory library.
- Uninstalling the Z Directory; removal.
- compiler setup: configuring Microsoft Visual Studio.
- Creating a program that uses the Z Directory.
- making an MFC (GUI) program with the Z Directory.
- Troubleshooting.
- Known Problems and Issues.
The Z Directory is installed on a computer via a setup wizard - installer program which can be obtained from Vettrasoft. The simplest way to do that is to download the it from the download page . The free trial version is good for 90 days from the date of install. It can only be used once, and wil not work without its own serial key. The setup wizard is straightforward. It will set the environment variables ZDIR_INCLUDES and ZDIR_LIBHOME (as user variables). Any previous values will be over-written. Installing Z Directory Trial Version requires a functioning Internet connection. This will register your Z Directory installation with Vettrasoft.
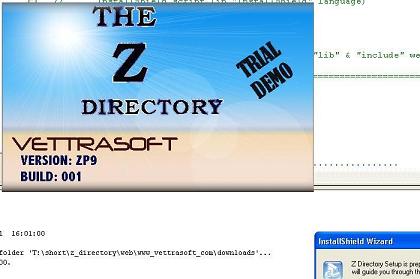
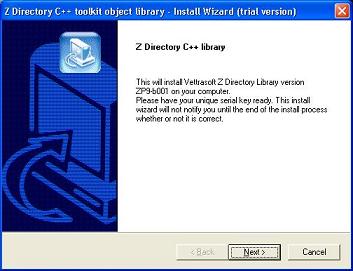
After you have obtained your copy of the Z Directory Free Trial, simply run the program. You should see an initial splash screen similar to this:
This is a good sign that the install has successfully begun. The first window is the welcome pane:
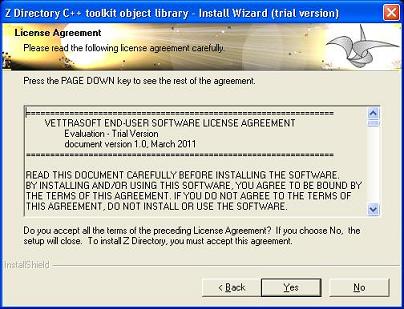
This is informational. Press Next. Pane 2 is the EULA, the license agreement between you and Vettrasoft. Please read it. If you want to continue with your install, press Yes. Otherwise press No to discontinue:
In the customer information window, you should enter the data you provided earlier when you downloaded your Z Directory setup-installer file:
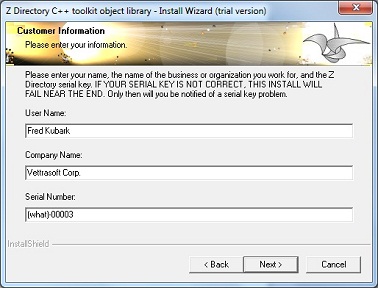
The serial number was mailed to the e-mail address provided on the vettrasoft.com download page. Due to the nature of the setup wizard, the serial key cannot be immediately verified. After you have filled out the fields, press Next. The next pane will let you change the install location of the Z Directory toolkit:
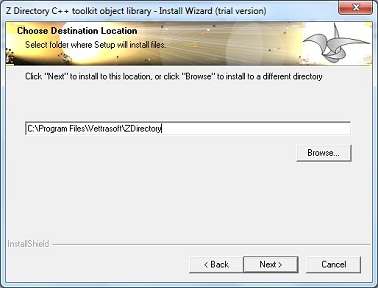
The location can be anywhere you choose. The given path is only a suggestion and you can set the path to whatever you want. Press Next to continue to the jump page:
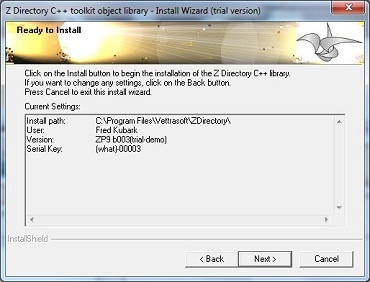
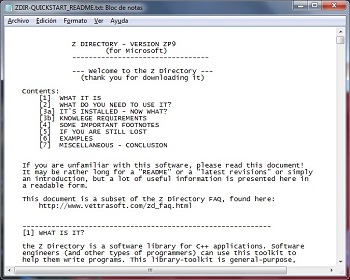
Press Next to proceed with the install. You should see several temporary 'command' windows during the install process; this is normal. DO NOT CLOSE THEM! Let them run. They are performing safe, vital tasks such as setting the necessary environment variables. Some may take a few seconds. If all was installed successfully, the installer README file should pop up:
And, upon successful install, this final window will appear:
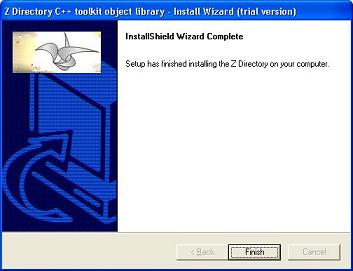
Press Finish, and the Z Directory object toolkit library will be ready to use. Your compiler or IDE (such as Visual Studio) will have to be configured to use the Z Directory (Vettrasoft has a auto-configure program for Visual Studio currently under development). The steps are described below.
Removing the Z Directory: uninstall.
Run the uninstall: from the Control Panel, go Add or Remove Programs (the exact route to this may vary depending on your flavor of Microsoft operating system). Scroll down the list of installed programs until you see "Z Directory", click-highlight it, and press the Change/Remove button. The exact route to un-installing programs in Microsoft seems to vary wildly from version to version of their operating system, so this is only an approximate guide.The installer wizard will give you the options to Modify, Repair , or Remove the Z Directory:
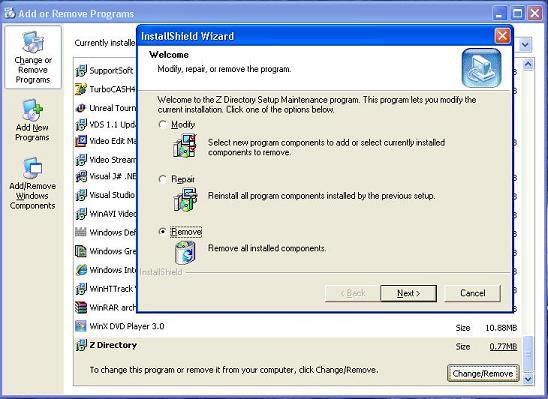
Select Remove. Follow the Next key through the wizard. You should recieve a popup notice about removing system DLLs - "You can delete this file, but doing do may prevent other applications from running correctly". Select the "Don't display this message again" checkbox, and press Yes:
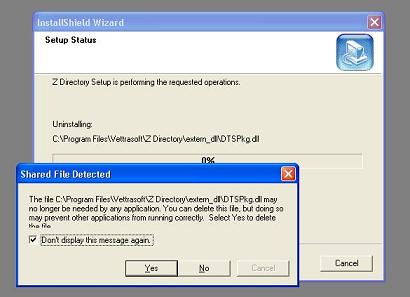
These are local versions of some required DLLs used by the Z Directory; the wizard removes the local instance of this file within the Z Directory. If you have them elsewhere on your computer, those files will not be effected.
Configuring Microsoft Visual Studio.
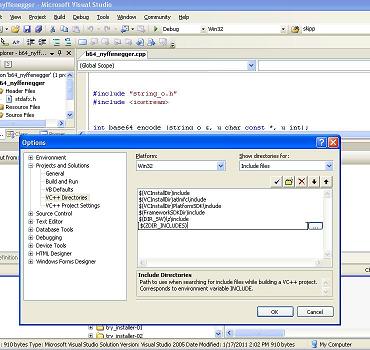
currently the Z Directory is well suited for Visual Studio (most versions: eg, 2003, 2005 (v. 8), 2008 (v. 9), 2010) on 32-bit Microsoft operating platforms. This is not to say it will not run in other environments - its original native platform was [unix] Solaris, a while back. Thare are a few simple steps that you must do when configuring a Microsoft Visual Studio project in order to use the Z Directory. This is a brief summary of the steps, described in more detail below:- 1. Add the environment variable ZDIR_INCLUDES to your project's "Additional Include Directories".
- 2. For 'release' type programs, add environment variable ZDIR_LIBHOME to your project's "Additional Library Directories". For 'debug' mode programs, use environment variable ZDIR_DEVLIBS.
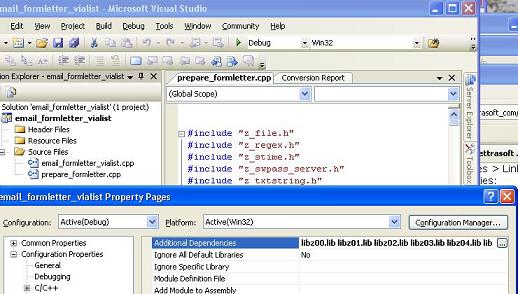
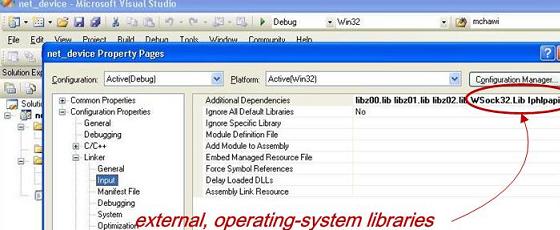
- 3. Add the Z Directory libraries to be used to the list of Additional Dependencies (eg, libz00.lib libz01.lib libz02.lib ..);
- 4. add the variable zcc_msvisucxx to the list of #define's in your project.
- 5. in your program, add calls to Z Directory functions z_start() & z_finish() to the main driver ("z_start()" goes near the top of the entry-point in your code; "z_finish()" should be the at or near the last line of code to execute).
$(ZDIR_INCLUDES)
like so:
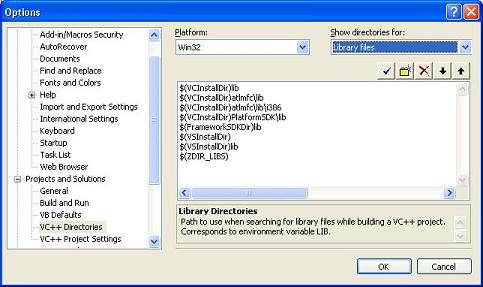
Similarly, change "Show directories for.." to "Library files", and add this line for release mode programs:
$(ZDIR_LIBHOME)or, for debug mode, use this line:
$(ZDIR_DEVLIBS)like so:
Next, for a given project, you need to include the actual libraries to link to. You need not include all layers of the Z Directory. You can specify just the ones you use. However, it is difficult to keep track of what is the highest layer used in your code, so the easiest thing is to include all the layers (currently: 12); eg,
libz00.lib libz01.lib libz02.lib libz03.lib libz04.lib libz05.lib libz06.lib libz07.lib libz08.lib libz09.lib libz10.lib libz11.lib Dnsapi.lib WSock32.Lib Iphlpapi.lib
Note that the last two are Microsoft libraries. If you use anything over layer 1 (that is, most programs), you will probably need these also.
To do this, select-highlight the project by right-clicking on it (in Visual Studio's Solution Explorer window), and go: Properties > Configuration Properties > Linker > Input, and in the "Additional Dependencies" line, add the libraries:
There is another way to set up these two environment variables - instead of plugging them into Visual Studio's overall settings, they can be added to a single, specific project. To do it this way, in Visual Studio, right-click on the project (in the Solution Explorer pane), and go Properties > Configuration Properties > C/C++ > General, and in "Additional Includes", put $(ZDIR_INCLUDES) While still under "Configuration Properties", go Linker > General, and set "Additional Library Dependencies" to $(ZDIR_LIBHOME). Again: this is an alternate route for setting up the 2 path variables, as described above.
Make sure that your "run-time library" is set to "Multi-threaded Debug (/MTd)", for degug-mode programs, or "Multi-threaded (/MT)", for release-type programs. This is found in your project (select-highlight the project by right-clicking on it in Visual Studio's Solution Explorer window), here: Properties > Configuration Properties > C/C++ > Code Generation. Change the "Runtime Library" setting from the default value "Multi-threaded Debug DLL (/MDd)" to "Multi-threaded Debug (/MTd)" [or simply "Multi-threaded (/MT)", for release mode].
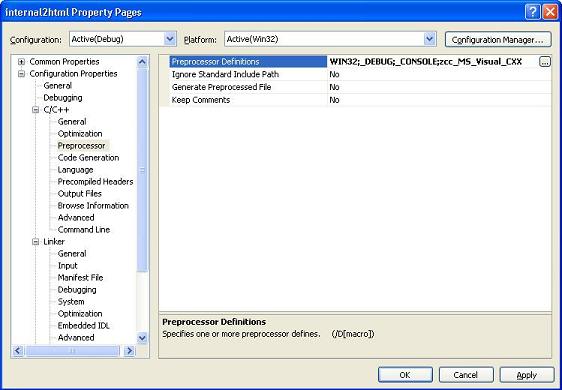
The code in the Z Directory sometimes needs to know which compiler it is being used by. To do this, add the variable zcc_msvisucxx to the list of #define's in your project. In Visual Studio, right-click on the project (in the Solution Explorer pane), and go: Properties > Configuration Properties > C/C++ > Preprocessor, and add this statement to the "Preprocessor Deinitions":
zcc_msvisucxx=1
(or, simply "zcc_msvisucxx", without the "=1" - the default):
The Z Directory uses many system calls, especially in networking, liberally employing sockets. On Microsoft platforms, that means using the WinSock implementation. It is necessary in Microsoft Win32 environments to perform some initialization code so that some functions in the operating system will work. For example, all socket system calls in Microsoft's Win32 API require a call to WSA_Init(), or else associated functions such as gethostbyname(), listen(), select(), etc. will fail.
Rather than worrying which Z Directory library components access OS functions that require such initialization, just invoke z_start() when your program begins, and call z_finish() upon exiting. This will handle internal initialization and cleanup. These 2 functions will do all internal startup initialization and post-processing required under the OS it runs on. It is encouraged to have programs on all platforms to use these functions, as future changes to the Z Directory may precipitate new initialization requirements. Also, other OS's may have their own quirks. Unfortunately, these function calls cannot be buried inside inside the Z library (these calls fail to work when done from within a library).
If your program runs in a Microsoft Windows environment, uses threads, and uses Z Directory SQL-domain objects - particularly dbbi_o [layer 4] or above (dbtable_o, orthodox_o, or orthodb_set_o), you need to call dbbi_o class static member function main_init(), like so:
    void main()
    {
        z_start();
        dbbi_o::main_init();
        // [your code]
        z_finish();
    }
This has to do with the fact that certain ADO/COM initializations (eg "__uuidof(ADODB::Recordset)") fail if done in [non-main] threads. Basically, call dbbi_o::main_init() in the non-threaded part of your code before accessing any layer-4 SQL objects.
So, there are 3 minimum required statements to your source code: z_start(), z_finish(), and the header file that declares them (4 - main_init() - with threads). Put this line before the "main()" function:
#include "z_func.h"Then, in the main driver of your program (eg, main() - the entry point), near the beginning of the executable statements, this line:
z_start();so that it is one of the first lines executed. Make sure it is called before any other Z Directory functions are called or objects invoked. Finally, put this line near/at the end of your program:
z_finish();
Here is a sample minimalist program:
    #include "z_func.h"

    int main(int argc, char *argv[])
    {
        char hs_buff[800];

        z_start();
        z_hostname (hs_buff, 800);
        std::cout << "If you don't call \"z_start()\", it might not link!\n";
        std::cout << "\t[2] hostname = " << hs_buff << "\n";
        z_finish();
        return (0);
    }
In z_start(), the Z Directory calls WSAStartup() internally
using winsock (version 2.2). It does the equivalent of this:
    WORD wVersion_req;
    WSADATA wsa_data;
    int wsaerr;

    wVersion_req = MAKEWORD (2, 2);
    wsaerr = WSAStartup (wVersion_req, &wsa_data);
making a GUI program with Microsoft Foundation Class Library (MFC).
You can make window-based (eg GUI) applications using MFC that fully utilize the Z Directory. This section covers what has been found to work - hopefully it is enough to get you on your way to doing the same. Note that the steps below does not constitute a full reference manual.Here's a quick boiler-plate sequence of steps to set up a [static library] MFC CFormView SDI application with Doc/View architecture:
- Using Microsoft Visual Studio (in this case, [the aging]
Visual Studio 2005), make an MFC application. In Visual Studio, go:
File > New Project..; select MFC Application.
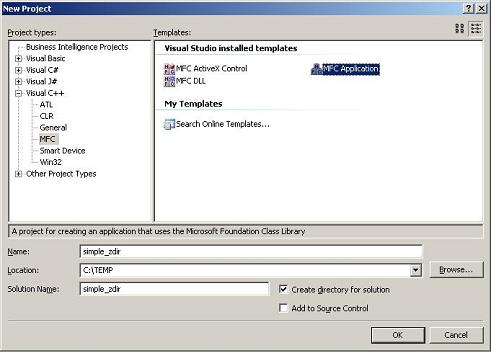
If you're creating a sub-directory for the proeject, drill down to the desired directory location and select the "create directory" option if you want the compiler IDE to bundle the source code files into a subdirectory:[x] Create directory for solutionPress Next. - ["Welcome" pane] click Next.
-
["Application Type" pane]
select Single document application type, with Document/View architecture support. For Use of MFC, select Use MFC in a static library. Also select (the default) "Use Unicode libraries".
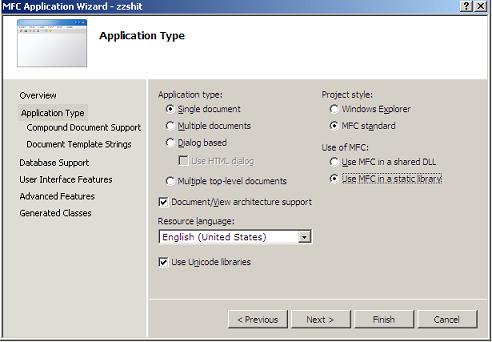
Click Next. - ["Compound Document Support" pane]: leave the default (None). Click Next.
- For ["Document Template Strings" pane]: use whatever you like. In this case, leave this pane alone and click Next.
- ["Database Support" pane]: in this example, leave this pane to its default values ("None") and click Next. for User Interface Features - click Next.
- ["User Interface Features" pane]: as with the previous pane, leave this pane to its default values (or configure to taste) and click Next.
- For ["Advanced Features" pane], we opt for the simplest case. In this example, de-select "Printing and print preview", "ActiveX controls", and "Common Control Manifest". Click Next.
- ["Generated Classes" pane]: use whatever you like for class name, .h file, and .cpp file. For "Base class", select the "CFormView" from the drop-down list. Note: this is only our boilerplate example here! Click Finish. Ignore the warning about no printing features available (press "Yes").
- Make sure the Solution Explorer tree is visible (go View > Solution Explorer). select the project, right-click on it, and open up the Properties windows (go: Properties). Go Configuration Properties > General. For "Use of MFC", select "Use MFC in a Static Library". Go Configuration Properties > C/C++ > Code Generation. Set "Runtime Library" to "Multi-Threaded Debug (/MTd)".
-
Add header file path and libraries. Go
Configuration Properties > Linker > General, and set
Additional Library Directories = $(ZDIR_INCLUDES)
Go: Configuration Properties > Linker > Input, and set
Additional Dependencies = libz00.lib libz01.lib libz02.lib libz03.lib libz04.lib libz05.lib libz06.lib libz07.lib libz08.lib libz09.lib libz10.lib libz11.lib Dnsapi.lib WSock32.Lib odbc32.lib Iphlpapi.lib crypt32.lib uafxcwd.lib Libcmtd.lib
Note that odbc32.lib and uafxcwd.lib are explicitly specified here, whereas for console-based applications this is not required. -
add the macro zSys_MSMFC to your preprocessor list of values
([project] > Configuration Properties > C/C++ > Preprocessor >
Preprocessor Definitions). In Visual Studio, you can simply
add the name to the list and it will default to a value of 1. A
typical list might look like so:
WIN32;_WINDOWS;_DEBUG;zSys_MSMFCThis is particularly vital if using components declared in the header file z_rawmfc.h. -
(maybe optional) Finally, it may be necessary to set this for
MFC applications:
Ignore Specific Library = uafxcwd.lib;Libcmtd.lib
Many of the settings are not affected by the Z Directory linkage, such as whether the program is dialog-based, MDI, or SDI (or something else). If you don't include "odbc32.lib" you may get a set of errors such as:
unresolved external symbol _SQLFreeHandle@8 referenced in function..
If you don't use these settings, you may get "multiply defined" errors:
          void * __cdecl operator new(unsigned int)" already defined in
          Libcmtd.lib(new.obj)
(which stems from uafxcwd.lib); or iostream functions may be
multiply defined:
int std::basic_streambuf >::sputn(char const *,int)" already defined in [FILE].obj
Which relates to msvcprtd.lib.
MFC extras - there are a few files (header and source code modules) that are included with the installer. These provide components focused mainly on bridging MFC to the Z Directory, such as:
- zstring_to_mswide() - convert string_o to wchar_t
- zstring_to_mfc() - convert string_o to CString
- zstring_to_mfc_wide() - convert string_o to CStringW
- zstring_to_mfc_ansi() - convert string_o to CStringA
- zstring_to_stl() - convert string_o to STL string
- mswide_to_zstring() - convert wchar_t to string_o
- mfc_to_zstring() - convert CString to string_o
- stl_to_zstring() - convert STL to string_o
- mfc_to_zstring_wlocale() - convert CString to string_o where the contents could be non-English
- mfcedit_to_zstring() - convert CEdit to string_o
- zstring_to_mfcedit() - convert string_o to CEdit
The header file, z_rawmfc.h, although located in the same includes directory as the all the regular Z Directory header files, is not considered to be a part of the Z Directory libraries. Also the source files (aptly named ms_vomit.cpp and mfc_vomit.cpp) are not compiled into the Z Directory. The reasons are twofold: (a) the function signitures are completely Microsoft-dependent (and STL), involving types such as CString, wchar_t, std::string, and CEdit; and (b) compilation requires an MFC context - the Visual Studio project, and hence the corresponding object modules emitted, are of different types (requiring different CRT runtime support modules) and cannot be linked together.
In order to use them, the source code and header files should be included in your MFC Visual Studio projects and compiled into object (.obj) module files. The resultant object modules are then linked together with Z Directory libraries in the usual way.
Hopefully this section has revealed all the tricks and tips needed to be able to use MFC with the Z Directory.
Microsoft Visual Studio: troubleshooting the build process (how-to's and caveats)
You may encounter some problems compiling and linking. Be sure your program calls "z_start()", which calls WSAStartup() (Microsoft sys call) internally. You shouldn't need to explicitly include networking library (eg winsocks), such as Ws2.lib. Visual Studio seems to have a peculiar problem of failing to properly link to Z Directory items otherwise.You may need to match compilation / link options. Here are some of the more relevant Visual Studio variables, and their settings as used by the Z Directory:
| Visual Studio path (under 'Configuration Properties') | option name | option value |
| General | Use of MFC | Use Standard Windows Libraries |
| General | Use of ATL | Not Using ATL |
| General | Character Set | USe Multi-Byte Character Set |
| C/C++ > General | Debug Info Format | C7 Compatible |
| C/C++ > General | Warning Level | Level 3 (/W3) |
| C/C++ > General | Detect 64-bit Portability Issues | Yes (/Wp64) |
| C/C++ > Optimization | Optimization | Disabled (/Od) |
| C/C++ > Optimization | Inline Function Expansion | Default |
| C/C++ > Code Generation | Enable String Pooling | No |
| C/C++ > Code Generation | Basic Runtime Checks | Both (/RTC1..) |
| C/C++ > Code Generation | Runtime Library | Multi-Threaded Debug (/MTd) |
| C/C++ > Code Generation | Floating Point Model | Precise (/fp:precise) |
| C/C++ > Precompiled Headers | Create/Use Precompiled Headers | Not Using Precompiled Headers |
| C/C++ > Advanced | Calling Convention | __cdecl (/Gd) |
| C/C++ > Advanced | Compile As | Compile as C++ Code (/TP) |
| C/C++ > Advanced | Disable Specific Warnings | 4244;4267;4995 |
| Linker > General | Enable Incremental Linking | Yes (/INCREMENTAL) |
| Linker > System | SubSystem | Console (/SUBSYSTEM:CONSOLE) |
| Linker > Advanced | Target Machine | MachineX86 (/MACHINE:X86) |
| Linker > Advanced | Delay Loaded DLL | Don't Support Unload |
multiple definitions of system call functions at link time.
Sometimes, when trying to link source code with Z Directory libraries, the output of Visual Studio's link process lists many methods and functions as 'redefined' (existing in more than one library or module), in Visual Studio archives such as MSVCP80D.dll or LIBCMTD.lib. This is indicative if your output has lines that look like these:
LIBCMTD.lib(setlocal.obj): error LNK2005: __configthreadlocale already defined in MSVCRTD.lib(MSVCR80D.dll)
libcpmtd.lib(xlock.obj) : error LNK2005: "public: __thiscall std::_Lockit::_Lockit(int)" already defined in msvcprtd.lib(MSVCP80D.dll)
MSVCRTD.lib(MSVCR80D.dll): error LNK2005: __fileno already defined in LIBCMTD.lib(fileno.obj)
This problem appears typically only in Visual Studio 2005. You'll need to change the "runtime library" option, from "Multi-threaded Debug DLL" (/MDd) to "Multi-threaded DLL" (/MD). Right click on the project name, click properties, go to Configuration Properties > C/C++ > Code Generation, and change from "Multithreaded Debug DLL" to "Multithreaded Debug". Make sure to do this for both debug and release options.
unresolved external system calls.
Since the Z Directory is like a Swiss army knife, it may require linking to lots of the OS's libraries. If you see a line such as this in a Microsoft environment:
error LNK2019: unresolved external symbol _GetAdaptersInfo@8 referenced ..
You may need to add these to your external libraries list:
    Dnsapi.lib
    WSock32.Lib
    Iphlpapi.lib
If you do not use functions or objects that rely on things like getting the computer's IP address (found in layer 2 computer_o class), you normally should not see such errors (unresolved externals). However, that is highly dependent on the linker you use, which may vary between operating systems, sub-classes of OS's (eg Micrsoft's family of post-NT systeams), and even versions of linkers.
Here is an example of a very large Microsoft-based program's link library list - you can use this as a boilerplate, if you are having trouble with missing libraries:
  [Z Directory library list]

  kernel32.lib user32.lib shell32.lib uuid.lib ole32.lib Iphlpapi.lib
  advapi32.lib ws2_32.lib gdi32.lib comdlg32.lib oleaut32.lib imm32.lib
  winmm.lib winspool.lib wldap32.lib ssleay32MDd.lib libeay32MDd.lib
  Dnsapi.lib WSock32.Lib crypt32.lib
If you are getting unresolved externals error messages from the link process, you can add these libraries, prefereably one at a time. Recompile after adding each library. repeat this until there are no more link-time unresolved external errors. You should keep the list as short as possible, to minimize build time. The above list is quite comprehensive and is way more than enough (hopefully).
'release' (production) mode programs fail to operate correctly.
Certain operating-system specific operations, such as accessing the Microsoft registry, may not perform correctly under 'release' mode compiled programs. There is a current known problem being currently investigated. If you experience such difficulties, please do not hesitate to report it to Vettrasoft.
uninstalling Z Directory: strange pop-up messages (free-trial edition)
If you uninstall the Z Directory, you may see odd pop-up warnings to the effect of "you are using an unauthorized version of the Z Directory", or something similar. These are benign - simply click on the OK button and let it proceed. It should uninstall.
The reason for this is that certain uninstaller program components of the Z Directory expect certain registry entries that have been deleted. This is a known, low-priority issue at Vettrasoft currently.
container "size()" member function unresolvable by the compiler.
If you are using a Z Directory container, such as set_o or llist_o, and you use size() (for getting the number of elements in the container, you may (particularly with gcc compiler) get an error message like so:
error: there are no arguments to "size" that depend on a template
parameter, so a declaration of "size" must be available.
size() is declared at the very top of the class hierarchy, in list_axiom_o. This issue has been unearthed very recently (Jan 2012), and is being investigated. The current workaround is to use
list_axiom_o::size()
instead of size().
program crashes when running in a thread (SQL-group).
In the SQL components of the Z Directory, starting with [L-4] dbbi_o, on Microsoft Windows environments ADO functions exist. Some COM initialization related to using ADO does not work when run in a thread. The solution is to call the function dbbi_o::main_init() in the main, non-threaded part of the application prior to creating threads. This is a static function, so it should be prefixed with "dbbi_o::". This issue is describe above.